Showing posts with label tutorial. Show all posts
Showing posts with label tutorial. Show all posts
Friday, January 25, 2013
NEW: Noise With Dirt Plus Quick Mask Tutorial
 11:37 AM | Posted by
Laura |
11:37 AM | Posted by
Laura |


My new release this week is another fun boy kit, Noise With Dirt!


This week, you can take advantage of the 20% off sale on new products, plus receive these stacked papers free with your purchase of the kit!

When I was creating my first layout with this kit, I decided to use some Photoshop paint brushes. We've got some really fun ones HERE at The Orchard, and you can always google for some free ones.
I created a new layer and started painting away. I then dragged my photo onto my canvas and clipped it to the layer that I had just painted (Layer>Create Clipping Mask or CTRL+ALT+G). This assures that the photo will end up being the shape of the paint splats on the layer beneath it.

This is what the photo looks like clipped to the shape on the layer under it.

I then merged those two layers so they were now one (Layer>Merge Down or CTRL+ALT+E).

Easy, right?!

I also made another page for my oldest.

That's all from me for now, enjoy your weekend!
 Labels:

Saturday, June 11, 2011
How'd She Do That?! Siggified Templates Tutorial & Freebie
I asked a few days ago on the new Facebook Fan Page if my customers were still loving the Siggified Templates...or if they were old news. It seemed like the majority of the fans really loved the templates and would like some new packs, and then a couple responses stated that they either had never seen them before or weren't sure how to use them.
For those of you not familiar, email or forum signatures are a fun way to help your fellow forum posters see and recognize your name...and sometimes even get a little taste of your personality, depending on how you decorate your 'siggy'.
Here is a step by step tutorial with screenshots to help you get over your siggy-making-slump! First, you can grab this free template I've made so you can follow along :)

(click the image to download)
First, I opened my siggy template. As you can see, all layers are clearly labeled.

I chose a photo to stick in the photo spot. I positioned it in the layer above the one labeled 'photo'.

I clipped my photo to the layer labeled photo. This can be done by selecting layer>create clipping mask or also by keying ctrl+alt+g on your keyboard. This essentially cuts the extra bits of photo off that you don't want showing.
I then resized my photo to my liking.

For this signature, I used my Pretty Much the Coolest digital scrapbooking kit. You can find this one and lots of others in my Scrap Orchard shop. :)

In this template, there are a couple of layers for clipping paper backgrounds to. I selected the paper I wanted and resized it to 72ppi or 'web size' since the siggy itself is 72 pixels per inch for web use.

I dragged the paper into my siggy canvas (you could also select layer>duplicate layer and select your siggy template .psd or .tif file as the file you'd like the paper to be copied to). Again I keyed ctrl+alt+g to 'clip' my paper to the shape provided.
I repeated this step for the other shape layer that was provided.
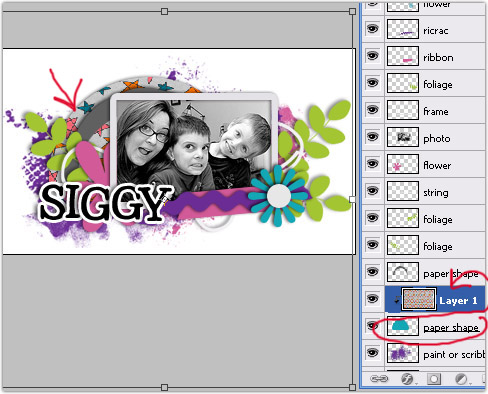
I chose a frame and resized it accordingly, repeating the drag & drop (or layer>duplicate layer to my siggy .psd or .tif file).
I positioned it above the layer marked 'frame' and resized until I was happy with the size and position of the frame. I then deleted the layer marked 'frame', since it is no longer needed.

I opened a doodled leaf element file and dragged it into my siggy workspace. I resized it and positioned it above one of the layers marked 'foliage'.
I then duplicated that branch layer twice for the other two foliage layers, and positioned them accordingly. You could use the same leaves or different ones, totally up to you! Delete the layers marked 'foliage', as you don't need them anymore.
I did the same with some doodle flowers for the layers marked 'flower'. I decided to use two different flowers. Again, I deleted the layers labeled 'flower' after I was finished using them as a guide.

For the layer marked 'button or brad', I decided to use a screw. The only screw available in the kit I was using was the centerpiece of a fabric flower. I used the elliptical marquee tool to select the screw and keyed ctrl+c to copy only the screw. You could also select edit>copy.
I then moved back into my siggy template workspace and keyed ctrl+v for paste. You could also select edit>paste. I repositioned and resized until I was happy with the placement of the screw in the center of one of my doodled flowers.

At the very bottom of the layers are two labeled 'paint or scribbles'. Instead of using paint splatters included in a kit, I decided to use the color overlay option in Photoshop to essentially recolor the paint shapes that were already provided in the template.
I used the eyedropper tool to click on a color from one of my papers. I repeated those steps on the other layer marked 'paint or scribbles' with another color from one of my flowers.

Lastly, we need a name, right? ;) I opened my alpha sheet and copy/pasted just the letters I needed to spell out my name. I made sure the alpha layers were placed above the ones marked 's' 'i' 'g' 'g' and 'y'. I provide these layers for a guide of where you should expect to place your alphabet or text in the spelling of your name or username.

After adding a drop shadow to my letters and moving them around a bit until I was happy with them, I selected image>trim to remove any excess space around my signature.
I also selected layer>merge visible to merge all of my layers together.

Many forums ask that you keep your signatures a certain size. For this siggy, I made sure it was no larger than 150 pixels tall. You can find these settings under image>image size.
I then saved my siggy as a .png file, keeping the transparency intact. Some forums have background colors other than white, so this promises that your siggy will still be lookin' hawt even if you're hangin' at a forum with a pink background.

Here is my finished siggy:
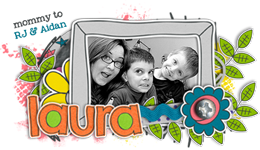
Comfortable with your siggy-making-abilities and wanting to change things up every once in a while? I've got five siggy template packs (each pack includes 4 templates) in my store...with more packs being added every month or two.
Saturday, May 28, 2011
Hybrid Activity Prompt Box + Free Template
Hello there, crafty friends! It's been a while since I've posted non-release related stuff, so I figured it was about time... I'd been tossing this idea around for a few days before I finally got to it and executed my little plan. With school having just been let out, I know my guys are bound to be bored at least 1-27 times per day. The only thing that really holds their attention for longer than 15min is video games. I think kids 'these days' have so much information thrown at them that they have trouble using their imaginations. I thought I'd give them a little push in creative and pretend play.
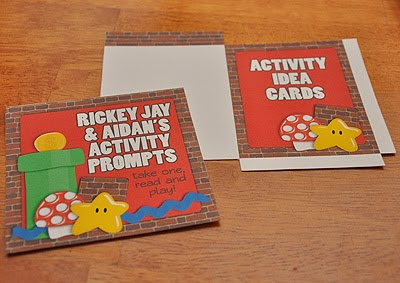
Today we're making a hybrid activity prompt box/container! I have a little template you can grab for the label and card holder envelope...click the image to download.

The digital scrapbooking kit I chose is 8 Bit World.

Here's what you'll need:

I used the template to create a label and card holder envelope for my activity container. If you don't have the same container, that's totally fine! A small box or empty coffee container would work just as well.
You'll need to cut out your template. If you don't have a fancy paper cutter or your blade was dull like mine, you can use scissors. ;)
Score where needed on your envelope.

Use adhesive of some kind to adhere your envelope as shown below. Press firmly for a minute or so if you're using glue, making sure that your envelope has time to dry a bit.

Set aside and let it dry the rest of the way as we move on to the next step.

If you are using a container that still has a label on it, go ahead and pull the label or stickers off now.

Don't have a garbage can nearby but DO have a small child? Excellent! They think it's really funny when you stick all the label pieces on their finger. See?

Use your adhesive again to stick your label on the front of your container.

Repeat the last step with your envelope on the back of your container.
Grab some index cards or small pieces of paper. Write some fun play prompts on them and stick them in your activity container. Place some extra blank cards or papers in your idea envelope for anytime an adult in the house has a cool idea for a prompt. The key is to surprise the kids, so try to write your ideas when they're not around ;)

Some of mine included using paint and only your elbow to write your name, assigning each child a 'part' to 'play' and a scenario to act out, assigning a certain number of things around the house with which to build a fort in some random number of minutes...you get the idea.
That's it! Easy, right? Took me about an hour. Enjoy! If you have any questions or comments, feel free to leave a reply to this post. :)
Today we're making a hybrid activity prompt box/container! I have a little template you can grab for the label and card holder envelope...click the image to download.
The digital scrapbooking kit I chose is 8 Bit World.
Here's what you'll need:

I used the template to create a label and card holder envelope for my activity container. If you don't have the same container, that's totally fine! A small box or empty coffee container would work just as well.
You'll need to cut out your template. If you don't have a fancy paper cutter or your blade was dull like mine, you can use scissors. ;)

Score where needed on your envelope.

Use adhesive of some kind to adhere your envelope as shown below. Press firmly for a minute or so if you're using glue, making sure that your envelope has time to dry a bit.

Set aside and let it dry the rest of the way as we move on to the next step.

If you are using a container that still has a label on it, go ahead and pull the label or stickers off now.

Don't have a garbage can nearby but DO have a small child? Excellent! They think it's really funny when you stick all the label pieces on their finger. See?

Use your adhesive again to stick your label on the front of your container.

Repeat the last step with your envelope on the back of your container.
Grab some index cards or small pieces of paper. Write some fun play prompts on them and stick them in your activity container. Place some extra blank cards or papers in your idea envelope for anytime an adult in the house has a cool idea for a prompt. The key is to surprise the kids, so try to write your ideas when they're not around ;)

Some of mine included using paint and only your elbow to write your name, assigning each child a 'part' to 'play' and a scenario to act out, assigning a certain number of things around the house with which to build a fort in some random number of minutes...you get the idea.
That's it! Easy, right? Took me about an hour. Enjoy! If you have any questions or comments, feel free to leave a reply to this post. :)
Monday, March 28, 2011
Something different this time...from Christine
Good morning to all, Christine here to bring you a little something different this time around. You see I have a little addiction (besides scrapping with Laura's goodies), I make flowers out of all kinds of things and I just can't stop!! Today I am going to show you how to make a super cute flower out of zippers, yes I said ZIPPERS. Here are some photos and instructions on how to make this 3 colored zipper flower that measures approximately 2.5 inches when finished.
(click on photos for a larger view)
(click on photos for a larger view)


So there it is ladies, I hope you enjoyed it and if you need any additional information or are interested in anything else I have just leave a comment and I will get back to you when I get back from our camping trip late in the week.
Don't forget to leave a comment for your chance to win and more importantly leave your e-mail.
I truly appreciate your time and hope you all give this a try, it is a little tricky at first but once you get the hang of it you will not want to stop, I promise you that...
Enjoy your week!
Thursday, March 24, 2011
3D Canvas Art {hybrid}
Hey!!! It's Amanda here, long time, no see, with another hybrid project. I am in love with the way this one turned out. The inspiration for this came from browsing & pinning a million (okay, well maybe not 1 million, but a whole bunch) new ideas at Pintrest. I hope to bring some awesome inspiration to you.
First lets gather some supplies. For this project I'm using one of the newest releases "Garden Whimsy" with Molly DeCrow. It was just perfect for the idea I came up with.
So a digital kit, a blank 8x10 canvas (I bought a 2-pack, so I have an extra for another project later), small piece of foam core, some modge podge, hot glue, glitter, colorful sharpie type markers, paint & brushes, and a pencil.
Start off in your editing program of choice, I'm using PSE. Create a new image that is 8"x10". This is going to be where we design our actual canvas, keeping in mind which parts will be made using other items.
For this I had it planned that I was going to paint around the outside with red & really wanted to use the super cute frame in the kit, that that became the shape I would use. Remember, not to shadow the elements because we'll be cutting them out anyways.
 This is what my digital canvas looked like before I printed. We will actually print a couple of different times. 1st turn on the red painted layer & the background layer, we'll use those in a minute. You should have a plain white canvas & all the elements on top, print that once regularly & once in mirror. Once that is done, hide all the layers except for the background paper & print that seperatly.
Once printed, cut out all the elements on the page that is printed normally, remember to leave the exterior frame intact so you can use it as a stencil to paint the edges. Trim up the background paper.
 Once everything is cut out, modge-podge the heart & sun to the small piece of foam core & set aside to dry. While they are drying coat the canvas with a generous coat of modge-podge, apply the background paper, this should cover the entire canvas. Press it down firmly, you may have to flip it over & rub it on from the inside to smooth out a few air bubbles.
 Once the modge podge is dry on the paper, it doesn't take too long for the top. Set the border stencil you cut out on the canvas & trace around it. You are marking the areas to paint now. You can also cut out the sun & heart now, it takes a few extra minutes, the foam isn't the easiest to cut, but it helps to use a SHARP crafting knife.
Paint around the edge of the frame, don't forget to do the wrapped edges as well, it may take 2 coats of paint to cover well. Let it dry for a few hours or, if you're like me & waiting until the kids are in bed to do projects leave it to dry until morning.
 Once it's dry, take a thick sharpie & outline the border; using as smooth of a stroke as possible.
 Now, it's time to put the text from the digital canvas onto our fun art project. This is where we use the mirror image & get out a little aggression by scribbling over the text you want to copy. Come on scribble good, you know it feels good to get that out.
Okay, now flip it over & position it over the canvas, making sure it's centered & lines up with what you've already got on the canvas. Use the pencil & trace over the areas you previously scribbled on the reverse side. (you may need to hold it up to the light or use thin paper when you print.
 Using some more modge-podge attache the Y and the U in their positions. Take a red sharpie & trace over the text you just transferred over from the paper. Use a blue one to make the little flowers. We're almost done. Now for the 3-D part. Take some hot glue & those foam core pieces you cut out, oh so long ago, & glue them into their correct places.
There you have it, a completed 3-D art canvas to hang on the wall.
 I hope you're inspired to go create some awesome art!!!
First lets gather some supplies. For this project I'm using one of the newest releases "Garden Whimsy" with Molly DeCrow. It was just perfect for the idea I came up with.
So a digital kit, a blank 8x10 canvas (I bought a 2-pack, so I have an extra for another project later), small piece of foam core, some modge podge, hot glue, glitter, colorful sharpie type markers, paint & brushes, and a pencil.
Start off in your editing program of choice, I'm using PSE. Create a new image that is 8"x10". This is going to be where we design our actual canvas, keeping in mind which parts will be made using other items.
For this I had it planned that I was going to paint around the outside with red & really wanted to use the super cute frame in the kit, that that became the shape I would use. Remember, not to shadow the elements because we'll be cutting them out anyways.

Once printed, cut out all the elements on the page that is printed normally, remember to leave the exterior frame intact so you can use it as a stencil to paint the edges. Trim up the background paper.


Paint around the edge of the frame, don't forget to do the wrapped edges as well, it may take 2 coats of paint to cover well. Let it dry for a few hours or, if you're like me & waiting until the kids are in bed to do projects leave it to dry until morning.


Okay, now flip it over & position it over the canvas, making sure it's centered & lines up with what you've already got on the canvas. Use the pencil & trace over the areas you previously scribbled on the reverse side. (you may need to hold it up to the light or use thin paper when you print.

There you have it, a completed 3-D art canvas to hang on the wall.

Tuesday, January 18, 2011
{January.Hybrid} with Happy to You
Hey, Amanda here posting your monthly Hybrid goodies. I couldn't resist playing with Laura's new-re-released kit Happy to You, & the add-on that comes with it. I just LOVE the bright, cheery colors & it's no wonder; I'm in the midst of planning a double birthday party.
 The strips of paper will be used for some paper rosettes that we're going to layer behind the cupcake.
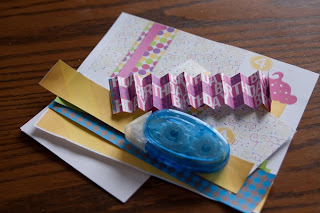


Lets get this glue & scissor party started!!
Digi-supplies: Happy to You, Happy to You Add-on by simply.scraps by Laura
Traditional Supplies: card blank, scissors, glue, mini-crystals,
Pick a card blank, mine is one that is 3x5ish size. Make a mock up card front in your photo editing program, laying out the papers & elements that you would like to use. Then drag the individual elements into a Letter sized page so you can print them all on one page.
I left the background papers clipped together since I wasn't planning on putting anything behind them.

Print & cut out all the pieces.

I folded up the "Birthday Girl" paper into small equal sections, this is going to be a 1/2 rosette for the cupcake to rest on.

After adhearing the papers background to the card blank, I folded the ribbon with some spontaneous folds, making sure that the white backing from the paper wasn't showing through.

Now to make the 1/2 rosette for the cupcake base. Run a line of adhesive, I'm using a 'tape runner' type today, along the edge of the 'papers' & press 1 end of the paper onto it, matching up the edges.

Fold the other end around matching up the edges & press to secure.
Next thread the folded up ribbon through the center of the rosette & secure the ends near the edges of the card blank. The center of the card will be pretty loose because nothing in the middle is adheared yet.


Place the cupcake on top of the rosette, near the center. I like it, but it needs something else. I decided to put another rosette into the corner, a smaller one underneath the larger rosette just for some added color & depth.
Using scalloped edge scissors I cut a thin strip of the yellow paper & made tiny, even folds for the whole strip.

Then glue the ends together making a circular piece of paper.

Cut a small circle of scrap paper & use it to secure the back of the rosette, pressing one edge into the center to make the flower.
Glue the rosette into place under the larger 1/2, secure the cupcake & the word art. Embellish with tiny crystals for 'sprinkles'.

Subscribe to:
Posts (Atom)