Showing posts with label amanda pratt. Show all posts
Showing posts with label amanda pratt. Show all posts
Thursday, March 24, 2011
3D Canvas Art {hybrid}
 12:01 AM | Posted by
Unknown |
12:01 AM | Posted by
Unknown |


Hey!!! It's Amanda here, long time, no see, with another hybrid project. I am in love with the way this one turned out. The inspiration for this came from browsing & pinning a million (okay, well maybe not 1 million, but a whole bunch) new ideas at Pintrest. I hope to bring some awesome inspiration to you.
First lets gather some supplies. For this project I'm using one of the newest releases "Garden Whimsy" with Molly DeCrow. It was just perfect for the idea I came up with.
So a digital kit, a blank 8x10 canvas (I bought a 2-pack, so I have an extra for another project later), small piece of foam core, some modge podge, hot glue, glitter, colorful sharpie type markers, paint & brushes, and a pencil.
Start off in your editing program of choice, I'm using PSE. Create a new image that is 8"x10". This is going to be where we design our actual canvas, keeping in mind which parts will be made using other items.
For this I had it planned that I was going to paint around the outside with red & really wanted to use the super cute frame in the kit, that that became the shape I would use. Remember, not to shadow the elements because we'll be cutting them out anyways.
 This is what my digital canvas looked like before I printed. We will actually print a couple of different times. 1st turn on the red painted layer & the background layer, we'll use those in a minute. You should have a plain white canvas & all the elements on top, print that once regularly & once in mirror. Once that is done, hide all the layers except for the background paper & print that seperatly.
Once printed, cut out all the elements on the page that is printed normally, remember to leave the exterior frame intact so you can use it as a stencil to paint the edges. Trim up the background paper.
 Once everything is cut out, modge-podge the heart & sun to the small piece of foam core & set aside to dry. While they are drying coat the canvas with a generous coat of modge-podge, apply the background paper, this should cover the entire canvas. Press it down firmly, you may have to flip it over & rub it on from the inside to smooth out a few air bubbles.
 Once the modge podge is dry on the paper, it doesn't take too long for the top. Set the border stencil you cut out on the canvas & trace around it. You are marking the areas to paint now. You can also cut out the sun & heart now, it takes a few extra minutes, the foam isn't the easiest to cut, but it helps to use a SHARP crafting knife.
Paint around the edge of the frame, don't forget to do the wrapped edges as well, it may take 2 coats of paint to cover well. Let it dry for a few hours or, if you're like me & waiting until the kids are in bed to do projects leave it to dry until morning.
 Once it's dry, take a thick sharpie & outline the border; using as smooth of a stroke as possible.
 Now, it's time to put the text from the digital canvas onto our fun art project. This is where we use the mirror image & get out a little aggression by scribbling over the text you want to copy. Come on scribble good, you know it feels good to get that out.
Okay, now flip it over & position it over the canvas, making sure it's centered & lines up with what you've already got on the canvas. Use the pencil & trace over the areas you previously scribbled on the reverse side. (you may need to hold it up to the light or use thin paper when you print.
 Using some more modge-podge attache the Y and the U in their positions. Take a red sharpie & trace over the text you just transferred over from the paper. Use a blue one to make the little flowers. We're almost done. Now for the 3-D part. Take some hot glue & those foam core pieces you cut out, oh so long ago, & glue them into their correct places.
There you have it, a completed 3-D art canvas to hang on the wall.
 I hope you're inspired to go create some awesome art!!!
First lets gather some supplies. For this project I'm using one of the newest releases "Garden Whimsy" with Molly DeCrow. It was just perfect for the idea I came up with.
So a digital kit, a blank 8x10 canvas (I bought a 2-pack, so I have an extra for another project later), small piece of foam core, some modge podge, hot glue, glitter, colorful sharpie type markers, paint & brushes, and a pencil.
Start off in your editing program of choice, I'm using PSE. Create a new image that is 8"x10". This is going to be where we design our actual canvas, keeping in mind which parts will be made using other items.
For this I had it planned that I was going to paint around the outside with red & really wanted to use the super cute frame in the kit, that that became the shape I would use. Remember, not to shadow the elements because we'll be cutting them out anyways.

Once printed, cut out all the elements on the page that is printed normally, remember to leave the exterior frame intact so you can use it as a stencil to paint the edges. Trim up the background paper.


Paint around the edge of the frame, don't forget to do the wrapped edges as well, it may take 2 coats of paint to cover well. Let it dry for a few hours or, if you're like me & waiting until the kids are in bed to do projects leave it to dry until morning.


Okay, now flip it over & position it over the canvas, making sure it's centered & lines up with what you've already got on the canvas. Use the pencil & trace over the areas you previously scribbled on the reverse side. (you may need to hold it up to the light or use thin paper when you print.

There you have it, a completed 3-D art canvas to hang on the wall.

Tuesday, January 18, 2011
{January.Hybrid} with Happy to You
Hey, Amanda here posting your monthly Hybrid goodies. I couldn't resist playing with Laura's new-re-released kit Happy to You, & the add-on that comes with it. I just LOVE the bright, cheery colors & it's no wonder; I'm in the midst of planning a double birthday party.
 The strips of paper will be used for some paper rosettes that we're going to layer behind the cupcake.


Lets get this glue & scissor party started!!
Digi-supplies: Happy to You, Happy to You Add-on by simply.scraps by Laura
Traditional Supplies: card blank, scissors, glue, mini-crystals,
Pick a card blank, mine is one that is 3x5ish size. Make a mock up card front in your photo editing program, laying out the papers & elements that you would like to use. Then drag the individual elements into a Letter sized page so you can print them all on one page.
I left the background papers clipped together since I wasn't planning on putting anything behind them.

Print & cut out all the pieces.

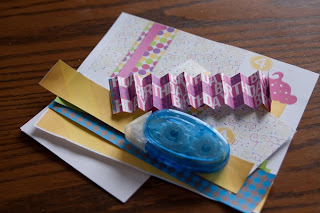
I folded up the "Birthday Girl" paper into small equal sections, this is going to be a 1/2 rosette for the cupcake to rest on.

After adhearing the papers background to the card blank, I folded the ribbon with some spontaneous folds, making sure that the white backing from the paper wasn't showing through.

Now to make the 1/2 rosette for the cupcake base. Run a line of adhesive, I'm using a 'tape runner' type today, along the edge of the 'papers' & press 1 end of the paper onto it, matching up the edges.

Fold the other end around matching up the edges & press to secure.
Next thread the folded up ribbon through the center of the rosette & secure the ends near the edges of the card blank. The center of the card will be pretty loose because nothing in the middle is adheared yet.


Place the cupcake on top of the rosette, near the center. I like it, but it needs something else. I decided to put another rosette into the corner, a smaller one underneath the larger rosette just for some added color & depth.
Using scalloped edge scissors I cut a thin strip of the yellow paper & made tiny, even folds for the whole strip.

Then glue the ends together making a circular piece of paper.

Cut a small circle of scrap paper & use it to secure the back of the rosette, pressing one edge into the center to make the flower.
Glue the rosette into place under the larger 1/2, secure the cupcake & the word art. Embellish with tiny crystals for 'sprinkles'.

Wednesday, December 29, 2010
Amanda's December Hybrid Project: Snowman Soup!
Okay, so this little gifty Amanda created is just about the cutiest little thing! Check it out:

Heather Roselli: DIY Templates -Get Well
Darcy Baldwin: DJB Daisy Mae
Also: cardstock, adhesive scissors (large & small), small cutting mat, ruler (for cutting & scoring)
I'm deep in the midst of Christmas crafting, baskets of sewing & baking, so I've got a quick little gift package.
One of the little projects I tackled in the kitchen was melting mini-candy canes into heart suckers, which instantly made me think of Hot Chocolate with peppermint & how perfect it would be to use the hearts as a stir stick, which then made me think of this perfect snowy, snowman kit, because it's a lot more fun to give 'SNOWMAN soup' as a gift instead of just an ordinary packet of Hot Chocolate!
Open up the template, I'm using the soup box, but you could use the envelope just the same, in your program of choice & fill with papers & embellishments. One thing I usually do to start, so that it saves a bit of ink, is to take all the flaps that will be glued, merge them onto one layer & turn them into a light color, I don't add anything to that layer, it's just there for printing & assembling.


Now get ready to glue, today I'm using some Zip Dry, it's pretty quick drying & for paper projects. Start with the little bottom tabs, glue them to the front bottom flap. I like to put a paper clip on it for just a few minutes so that I can do other things while the glue sets up. That'll create the front of the box.

The next flaps need to be glued at the same time so the box closes, so get some glue on the side flap & the back bottom flap then fold into the box & press to secure.

Fill a hot chocolate packet, some marshmallows (I'm using a super sized, homemade one), & fold the top down. Add the peppermint sucker to the outside & you've got a quick last minute gift.
Heather Roselli: DIY Templates -Get Well
Darcy Baldwin: DJB Daisy Mae
Also: cardstock, adhesive scissors (large & small), small cutting mat, ruler (for cutting & scoring)
I'm deep in the midst of Christmas crafting, baskets of sewing & baking, so I've got a quick little gift package.
One of the little projects I tackled in the kitchen was melting mini-candy canes into heart suckers, which instantly made me think of Hot Chocolate with peppermint & how perfect it would be to use the hearts as a stir stick, which then made me think of this perfect snowy, snowman kit, because it's a lot more fun to give 'SNOWMAN soup' as a gift instead of just an ordinary packet of Hot Chocolate!
Open up the template, I'm using the soup box, but you could use the envelope just the same, in your program of choice & fill with papers & embellishments. One thing I usually do to start, so that it saves a bit of ink, is to take all the flaps that will be glued, merge them onto one layer & turn them into a light color, I don't add anything to that layer, it's just there for printing & assembling.

Print that pretty thing out & then get to cutting.
Once cut, score on the folding lines & get everything folded up into it's place.

Now get ready to glue, today I'm using some Zip Dry, it's pretty quick drying & for paper projects. Start with the little bottom tabs, glue them to the front bottom flap. I like to put a paper clip on it for just a few minutes so that I can do other things while the glue sets up. That'll create the front of the box.

The next flaps need to be glued at the same time so the box closes, so get some glue on the side flap & the back bottom flap then fold into the box & press to secure.

Fill a hot chocolate packet, some marshmallows (I'm using a super sized, homemade one), & fold the top down. Add the peppermint sucker to the outside & you've got a quick last minute gift.

Adorable, yes?! Love it :) Thanks, Amanda!

Wednesday, December 1, 2010
Lots of Sneak Peeks & November's Hybrid Project From Amanda!
I have a whole bunch of sneaks for you today. A pyramid of sneaks, if you will. ;) Check 'em out!
I'm not ready JUST YET to reveal where I'll be guesting for the month of December, but below are two sneaks of my first exclusive releases in this mystery guest shop!


A little boyish, a little doodly....ALLLL funky, baybeh. ;)
Next up are a few sneaks of a line of alphas I have coming to The Digichick tomorrow!
I'm not ready JUST YET to reveal where I'll be guesting for the month of December, but below are two sneaks of my first exclusive releases in this mystery guest shop!


A little boyish, a little doodly....ALLLL funky, baybeh. ;)
Next up are a few sneaks of a line of alphas I have coming to The Digichick tomorrow!


Colorful. Painty. Delicious. MmmHmm.
Onward! My hybrid creative team rockstar Amanda has written up a blog post with step by step instructions for making yourself a cute little hybrid stocking using my collab Ho Ho Ho w/Micheline Martin. :)

Stocking Mini-Gift Holder
Supplies:
Laura Banasiak & Micheline Martin: HO HO HO
Stocking Template: by Amanda Pratt (me - download HERE)
Stocking Template: by Amanda Pratt (me - download HERE)
Card Stock, thread, ribbon, glue, glitter, scissors & tweezers or paper rolling tool.
Open a "Letter" sized document, drag the template files onto the page.
Fill in template with papers & embellies. This will be the front.
Duplicate the layers & flip horizontally, to make a mirror image for the back. I didn't want the back decorated so, deleted all the ribbons/bows/tags.
Arrange them on the page so that both sides fit without clipping off any edges.
Make 2 small round shapes & fill with paper, these will become paper flowers to embellish the stocking.
Duplicate the layers & flip horizontally, to make a mirror image for the back. I didn't want the back decorated so, deleted all the ribbons/bows/tags.
Arrange them on the page so that both sides fit without clipping off any edges.
Make 2 small round shapes & fill with paper, these will become paper flowers to embellish the stocking.

Print. Make sure to use borderless printing to ensure no cut off edges (if printer allows).

Cut out pieces.

Starting on an edge of one of the round pieces, cut into a spiral.
Using tweezers, a rolling rool or even just your fingers, roll up the spiral into a tight 'rose', use glue to secure & let dry.
Once dry, dip edges in glue & then into fine glitter.
Once dry, dip edges in glue & then into fine glitter.

Match front & back pieces together & sew up the edges, or thread with ribbon or whatever suits your fancy. (I needed to make the most of nap time, so I used the sewing machine), except where you have embellies that overlap the edge.
Once the sewing is complete, flip the stocking over & use a dab of glue where you didn't sew. Let dry & then gently give your stocking a little shape by squeezing the edges together.

Glue the roses onto the front of your stocking, add a ribbon hanger & you're done.

Perfect for trimming the tree or giving as gifts with a gift card or something small tucked inside.
Thanks, Amanda! :)
 Labels:
amanda pratt,
christmas,
guest spot,
hybrid,
micheline martin,
sneak peek,
tutorial
|
Labels:
amanda pratt,
christmas,
guest spot,
hybrid,
micheline martin,
sneak peek,
tutorial
|
 1 comments
Subscribe to:
Posts (Atom)