Saturday, June 11, 2011
How'd She Do That?! Siggified Templates Tutorial & Freebie
I asked a few days ago on the new Facebook Fan Page if my customers were still loving the Siggified Templates...or if they were old news. It seemed like the majority of the fans really loved the templates and would like some new packs, and then a couple responses stated that they either had never seen them before or weren't sure how to use them.
For those of you not familiar, email or forum signatures are a fun way to help your fellow forum posters see and recognize your name...and sometimes even get a little taste of your personality, depending on how you decorate your 'siggy'.
Here is a step by step tutorial with screenshots to help you get over your siggy-making-slump! First, you can grab this free template I've made so you can follow along :)

(click the image to download)
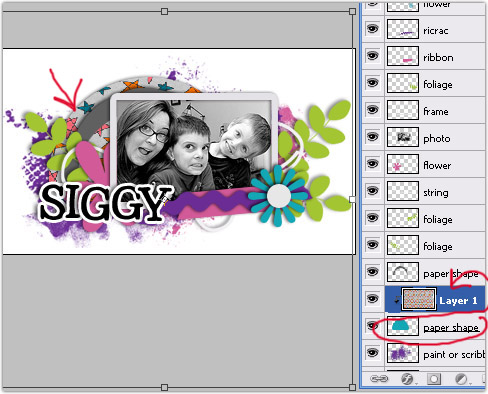
First, I opened my siggy template. As you can see, all layers are clearly labeled.

I chose a photo to stick in the photo spot. I positioned it in the layer above the one labeled 'photo'.

I clipped my photo to the layer labeled photo. This can be done by selecting layer>create clipping mask or also by keying ctrl+alt+g on your keyboard. This essentially cuts the extra bits of photo off that you don't want showing.
I then resized my photo to my liking.

For this signature, I used my Pretty Much the Coolest digital scrapbooking kit. You can find this one and lots of others in my Scrap Orchard shop. :)

In this template, there are a couple of layers for clipping paper backgrounds to. I selected the paper I wanted and resized it to 72ppi or 'web size' since the siggy itself is 72 pixels per inch for web use.

I dragged the paper into my siggy canvas (you could also select layer>duplicate layer and select your siggy template .psd or .tif file as the file you'd like the paper to be copied to). Again I keyed ctrl+alt+g to 'clip' my paper to the shape provided.
I repeated this step for the other shape layer that was provided.
I chose a frame and resized it accordingly, repeating the drag & drop (or layer>duplicate layer to my siggy .psd or .tif file).
I positioned it above the layer marked 'frame' and resized until I was happy with the size and position of the frame. I then deleted the layer marked 'frame', since it is no longer needed.

I opened a doodled leaf element file and dragged it into my siggy workspace. I resized it and positioned it above one of the layers marked 'foliage'.
I then duplicated that branch layer twice for the other two foliage layers, and positioned them accordingly. You could use the same leaves or different ones, totally up to you! Delete the layers marked 'foliage', as you don't need them anymore.
I did the same with some doodle flowers for the layers marked 'flower'. I decided to use two different flowers. Again, I deleted the layers labeled 'flower' after I was finished using them as a guide.

For the layer marked 'button or brad', I decided to use a screw. The only screw available in the kit I was using was the centerpiece of a fabric flower. I used the elliptical marquee tool to select the screw and keyed ctrl+c to copy only the screw. You could also select edit>copy.
I then moved back into my siggy template workspace and keyed ctrl+v for paste. You could also select edit>paste. I repositioned and resized until I was happy with the placement of the screw in the center of one of my doodled flowers.

At the very bottom of the layers are two labeled 'paint or scribbles'. Instead of using paint splatters included in a kit, I decided to use the color overlay option in Photoshop to essentially recolor the paint shapes that were already provided in the template.
I used the eyedropper tool to click on a color from one of my papers. I repeated those steps on the other layer marked 'paint or scribbles' with another color from one of my flowers.

Lastly, we need a name, right? ;) I opened my alpha sheet and copy/pasted just the letters I needed to spell out my name. I made sure the alpha layers were placed above the ones marked 's' 'i' 'g' 'g' and 'y'. I provide these layers for a guide of where you should expect to place your alphabet or text in the spelling of your name or username.

After adding a drop shadow to my letters and moving them around a bit until I was happy with them, I selected image>trim to remove any excess space around my signature.
I also selected layer>merge visible to merge all of my layers together.

Many forums ask that you keep your signatures a certain size. For this siggy, I made sure it was no larger than 150 pixels tall. You can find these settings under image>image size.
I then saved my siggy as a .png file, keeping the transparency intact. Some forums have background colors other than white, so this promises that your siggy will still be lookin' hawt even if you're hangin' at a forum with a pink background.

Here is my finished siggy:

Comfortable with your siggy-making-abilities and wanting to change things up every once in a while? I've got five siggy template packs (each pack includes 4 templates) in my store...with more packs being added every month or two.
Subscribe to:
Post Comments (Atom)


12 comments:
Thanks for the tutorial...I'm inspired to start playing with siggies! :)
Thank you so much for this post. I want to let you know that I posted a link to your blog in CBH Digital Scrapbooking Freebies, under the Page 4 post on Jun. 12, 2011. Thanks again.
Thank you so much for this post. I want to let you know that I posted a link to your blog in CBH Digital Scrapbooking Freebies, under the Page 4 post on Jun. 12, 2011. Thanks again.
Just a quick note to let you know that a link to this post will be placed on CraftCrave today [13 Jun 12:00am GMT]. Thanks, Maria
Thanks for the tutorial. Not only did I learn how to use those siggy templates but I also picked up a couple of new scrapping skills.
thanks for the awesome freebie Laura!!!
Woo Hoooo!!! I finally have a siggy!!! lololol, thank you so much for the tutorial and the freebie! Can you tell I'm excited? I'll post my siggy in your gallery =)
Love it! I notice some siggys have links for facebook and twitter. How is that done --- or it that way complicated? Thanks! JTS
For the siggies that are linked, most are cropped into different images and linked individually. :)
Laura,
Thank you so much for this tutorial and template. I used it for my new siggy at SO! It has also really helped me learn how to use templates better.
Melissa O.
Thank you so much! I'd like to use it for my siggy! :-)
Thank you so much! I'd like to use it for my siggy!